Glade Reference
Glade can use python to create parameterised cells, or PCells. A parameterised cell has a python script that defines how the cell is created, and takes parameters. For example a MOS device might take a W and L value and have the transistor automatically created with the correct poly, diffusion and contact layers. Please note that Glade PCells are NOT compatible with Cadence Skill-based PCells, or Synopsys PyCells.
To use Pcells in Glade you first need to define python code for the cells. An example is given below of a NMOS transistor Pcell that takes parameters w and l and builds a device according to encoded design rules. The Pcell has pins for the source, gate and drain nodes.
#------------------------------------------------------------------------------
#
# NMOS Pcell example
#
# Note: The first argument is always the cellView of the subMaster.
# All subsequent arguments should have default values and will
# be passed by name
#
#------------------------------------------------------------------------------# Import the db wrappers
from ui import *
# The entry point. The name should match the superMaster.
def nmos(cv, w=1.1, l= 0.18)
# Some useful variables
lib = cv.lib()
dbu = lib.dbuPerUU()
width = int(w * dbu)
length = int(l * dbu)< /FONT >
# Some predefined rules
cut = int(0.18 * dbu)
poly_to_cut = int(0.1 * dbu)
active_ovlp_cut = int(0.1 * dbu)
poly_ovlp_active = int(0.12 * dbu)
nplus_ovlp_active = int(0.2 * dbu)
metal_ovlp_cut = int(0.05 * dbu)< /FONT >
# Create active
tech = lib.tech()
layer = tech.getLayerNum("active", "drawing")
r = Rect(-width/2,
-(active_ovlp_cut + cut + poly_to_cut + length/2),
width/2,
(active_ovlp_cut + cut + poly_to_cut + length/2))
active = cv.dbCreateRect(r, layer);
bbox = Rect(active.bBox())< /FONT >
# Create nplus
layer = tech.getLayerNum("nplus", "drawing")
r = Rect(bbox.left() - nplus_ovlp_active,
bbox.bottom() - nplus_ovlp_active,
bbox.right() + nplus_ovlp_active,
bbox.top() + nplus_ovlp_active)
cv.dbCreateRect(r, layer);
# Create poly
layer = tech.getLayerNum("poly", "drawing")
p = Rect(-width/2-poly_ovlp_active,
-length/2,
width/2+poly_ovlp_active,
length/2)
gate = cv.dbCreateRect(p, layer)
net = cv.dbCreateNet("G")
pin = cv.dbCreatePin("G", net, DB_PIN_INPUT)
# Create contacts
layer = tech.getLayerNum("cont", "drawing")
numCuts = width / (2 * cut)
c = Rect(-width/2 + active_ovlp_cut - cut * 2,
-(length/2 + poly_to_cut + cut),
-width/2 + active_ovlp_cut - cut,
-(length/2 + poly_to_cut))
for i in range(numCuts) :
c.offset(cut * 2, 0)
cv.dbCreateRect(c, layer)
c = Rect(-width/2 + active_ovlp_cut - cut * 2,
(length/2 + poly_to_cut),
-width/2 + active_ovlp_cut - cut,
(length/2 + cut + poly_to_cut))
for i in range(numCuts) :
c.offset(cut * 2, 0)
cv.dbCreateRect(c, layer)
# Create metal
layer = tech.getLayerNum("metal", "drawing")
m = Rect(-width/2 + active_ovlp_cut - metal_ovlp_cut,
-length/2 - poly_to_cut - cut - metal_ovlp_cut,
width/2 - active_ovlp_cut + metal_ovlp_cut,
-length/2 - poly_to_cut + metal_ovlp_cut)
source = cv.dbCreateRect(m, layer)
net = cv.dbCreateNet("S")
pin = cv.dbCreatePin("S", net, DB_PIN_INPUT)
m = Rect(-width/2 + active_ovlp_cut - metal_ovlp_cut,
length/2 + poly_to_cut - metal_ovlp_cut,
width/2 - active_ovlp_cut + metal_ovlp_cut,
length/2 + poly_to_cut + cut + metal_ovlp_cut)
drain = cv.dbCreateRect(m, layer)
net = cv.dbCreateNet("D")
pin = cv.dbCreatePin("D", net, DB_PIN_INPUT)
# Update the subMaster's bounding box
cv.update()
In the above example, we declare a function called 'nmos' which takes 3 arguments. The first argument is always a cellView object, and should be called 'cv' (or at least a string containing the substring 'cv'). The remaining arguments can be any desired parameters; they must all have default values. This is so that if one of the parameters is missing, the default value can be used.
Note that you can pass a list of points to a Pcell. A list of points is defined in the standard Python syntax, and can be set as a string property in the Add Property dialog e.g.
[[0,0],[1000,0],[1000,1000],[0,1000]]
It is important to follow the above syntax carefully - do not add any whitespace to the Pcell argument list. All points must have an X and Y coordinate.
If you change any of the Pcell arguments within your code and want the instance properties updated, you should save your properties e.g.
def nmos(cv, w=1.1, l= 0.18) a = w * l
cv.dbAddProp("a", a)
Also note that all dimensions must be converted to database units (dbu).
Why might you want to do this? Well, if you create an extraction pcell (see e.g. pres_ex.py in the distribution directory), you can include pcell arguments that you can to calculate and use e.g. for netlisting. For example for the resistor example, your pcell code computes 'r' from the extracted width, length, number of bends and the resistor's sheet resistance in ohms/sq which can be hard coded into the extraction pcell.
With the PCell code created, it should be saved to a file e.g. nmos.py - the .py extension is required, and the name of the file, like the name of the function, must match the intended cellView name for the pcell. Currently the python pcell files can reside in any directory, provided that directory is included in the PYTHONPATH environment variable. Refer to Python documentation for more details.
Next, in Glade use the New Cell command to create the PCell master.
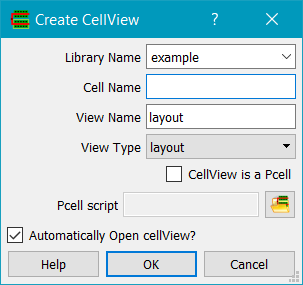
Click on the Pcell? button to enable the Pcell script field. The file chooser can be used to select the name of the script file. This will create a new cellView for the pcell. Do not edit this cell - it is solely for visual display of the results of the script, using default values for the arguments.
Alternatively, PCells can be loaded into Glade using the ui().loadPcell() command.
To place an instance of a pcell, use the Create Instance command to place the pcell instance.
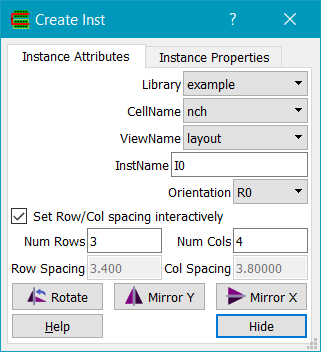
First set the required pcell parameters. These are stored as properties on the instance, typically as floats.
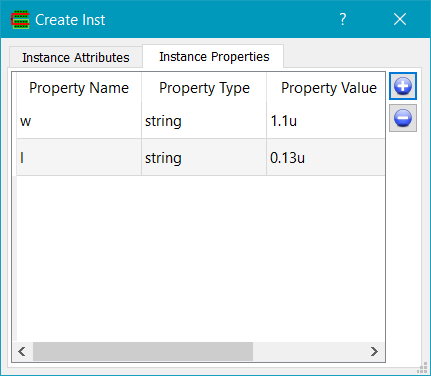
You use the Instance Properties tab on the Create Inst dialog to add properties. Then choose the Pcell name from the CellName field of the Instance Attributes tab. Click on the location of the origin of the Pcell to create the required instance.
To change the parameters of a Pcell instance, for example to change its width, select the instance and use the Query Properties dialog to modify the instance's properties. The Pcell will be updated accordingly. Each instance of a Pcell will create a superMaster cell - this cell is names according to the Pcell name, concatenated with the Pcell parameters e.g. nmos$w:1.000000$$l:0.180000$
PCells can be loaded in Python code, and instances of PCells can be created and their properties changed. For example:
gui = cvar.uiptr
gui.importTech("default", "C:/users/keith/c++stuff/glade4_win32/example.tch")
gui.loadPCell("default", "nmos13_multi")
lib = getLibByName("default")
cv = lib.dbOpenCellView("test", "layout", 'w')
origin = Point(0,0)
i = cv.dbCreatePCellInst("default", "nmos13_multi", "layout", origin)
i.dbReplaceProp("w", 2.50)
cv.dbUpdatePCell(i);
cv.update()
gui.openCellView("default", "test", "layout")
In the above, we create a library 'default' and load a PCell called 'nmos13_multi'. We then create a cellView called 'test' and create a PCell instance. Next we change the value of the property 'w' to 2.5. After changing any property or properties, we need to call dbUpdatePCell(), giving it the PCell instance as the argument. Lastly the cellView is updated in the database and opened in the gui.
Copyright © Peardrop Design 2026.